Image Acquisition and Interpretation
Introduction
Proper image acquisition and interpretation are the foundation of accurate and reliable echocardiography. High-quality images ensure that key cardiac structures, such as chambers, valves, and vessels, are clearly visualized, allowing for precise diagnosis and effective clinical decision-making. Poor acquisition techniques or suboptimal interpretation can lead to missed abnormalities or misdiagnosis, impacting patient care. This section covers key echocardiographic views (e.g., parasternal, apical) and techniques to optimise image quality by adjusting settings such as depth and gain while managing artifacts. It also introduces a systematic approach to interpretation, focusing on evaluating chamber size, valve function, and wall motion. By mastering these fundamentals, you can consistently achieve high-quality imaging and reliable clinical insights.
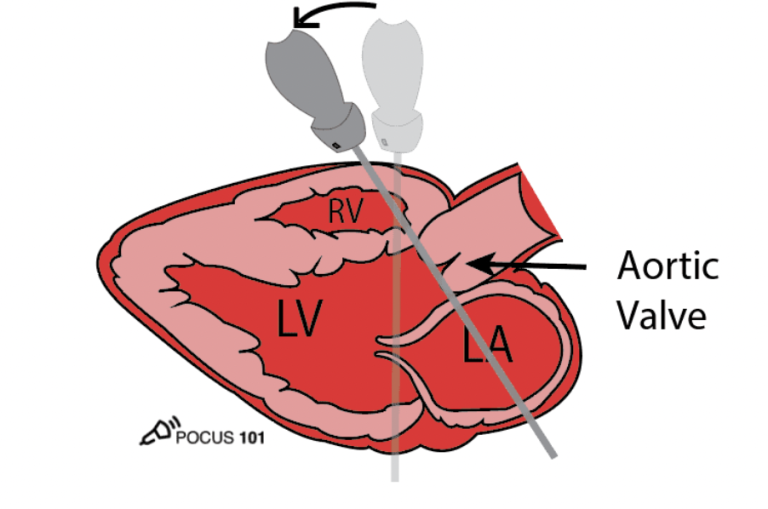
Parasternal long-axis (PLAX)
How to acquire:
- Patient should be on their left hand side (left lateral decubitus position).
- Place probe to the left of the sternum, typically in the 3rd or 4rth intercostal space.
- Probe marker should be facing the right shoulder of the patient.
- Gently tilt or rotate the probe to optimise the image – ensure the LV is elongated and mitral & aortic valves are open in their entirety.
What structures can we assess in this view?
- Left ventricular cavity.
- Left atrium.
- Inferolateral LV wall.
- Interventricular septum.
- Mitral valve.
- Aortic valve.
- RVOT & RV anterior wall.
- Aortic root.
PLAX inflow
How to acquire:
- From the standard PLAX window, tilt the head of the probe inferiorly & slightly medially.
- Every patient has different anatomy, therefore, slight adjustments need to be made – these instructions are not a ‘one size fits all’.
What structures can we see in this view?
- Right ventricle.
- Right atrium.
- Tricuspid valve (typically posterior leaflet on the left of the screen, anterior on the opposite. Septal can sometimes be seen depending on imaging cut).
- IVC & SVC can sometimes be seen.
- Eustachian valve may be visible.
- Coronary sinus orifice.
Ascending aorta & Pulmonary artery
How to obtain (Asc ao)
- From your standard PLAX view, move the footprint of the probe up an intercostal space slowly, and ascending aorta should present itself.
- Often you might need to position the probe slightly more laterally.
- Difficulties include slim patients & low parasternal windows.
- A top tip for low parasternal window patients is: lean the patient further onto their left-hand side, ask them to exhale and hold their breath out – ascending aorta may present itself.
What should we assess in this view?
- Dilatation or aneurysm.
- Dissection.
- Abnormal flows – increased velocity could be detected from this view in AS cases.
How to obtain (pulmonary artery):
- From your standard PLAX position, angle the footprint of the probe superiorly and possibly slightly medially.
- If you think of cardiac anatomy, this makes sense as the PA is anterior to the asc ao.
What should we assess in this view?
- PA size – is there any dilatation?
- PA flow – stenotic valve? Regurgitation? Narrowed artery?
Parasternal short axis
How to obtain:
- From a good PLAX window, rotate the probe 90 degrees, so the marker is now facing the patient’s left shoulder.
- This changes the imaging plane from long-axis to short axis, providing a cross-sectional view of the heart.
- Gentle adjustments must be made to optimise the image.
- In order to move throughout the levels in short-axis, once at aortic valve level, tilt the probe footprint inferiorly until you see mitral valve appear. Further inferior tilting will take you to papillary and then apex.
Levels of the short axis view:
- Aortic valve level: you can assess the aortic valve (number of cusps, mobility, thickening, regurgitation), LA, IAS, tricuspid valve, pulmonary valve & pulmonary artery.
- Mitral valve level: assess the ‘fish mouth’ appearance of the mitral valve (mobility, thickening, regurgitation). Annular calcification. Basal LV wall segments for RWMA.
- Papillary level: LV segmental assessment for RWMA. Papillary muscle assessment (parachute mitral valve).
- Apex: assess the LV function at the apex. Look for any thrombus present. LV bands? LVNC?
Apical window
How to obtain (A4C):
- Place the probe at the point of maximal impulse (PMI) or apex of the heart, located in the 5th intercostal space near the midclavicular line.
- Position the probe marker toward the patient’s left side (3 o’clock position).
- Ensure the interventricular septum is vertical and in the centre of the image for proper alignment.
- Avoid foreshortening the image – the chambers should be elongated (bullet shaped), apex should not be contracting down into the ventricle, the heart should not have a ‘rugby ball’ appearance. A tip to avoid this is to pull the probe down ever so slightly.
To obtain A5C: from your A4C position, angle the probe footprint anteriorly to open up the aorta. Occassionally, a slight rotation of the probe clockwise is needed to open up the aorta fully. This helps when assessing flow dynamics through the valve.
What to look for: regional wall motion abnormalities? Mitral valve abnormalities? LV volumes/EF? LA volume? Aortic valve abnormalities?
Apical 2 & 3 chamber
How to obtain:
- To find the 2 chamber window, from the 4 chamber view; rotate the probe counterclockwise roughly 45 degrees, so the probe marker is pointing towards the patients left shoulder.
- For the 3 chamber, rotate another 45 degrees counter clockwise – this view should be similar to your PLAX, visualising the same structures.
- Fine tuning is needed with every view, for example, angling slightly anteriorly to open up the aorta in the 3 chamber view.
- Think of ‘dragging the skin’ when fine tuning, these movements need to be minuscule.
What structures can we see?
- In the 2 chamber view on the right of the screen you can visualise the anterior wall, with the opposite side being the inferior wall. You can also see the left atrium & mitral valve.
- 3 chamber helps visualise IVS & inferolateral wall.
- Good imaging from the apical windows is paramount for an accurate LV systolic function assessment.
Sub-costal & IVC
How to obtain:
- For this view the patient needs to be supine, laying flat on their back.
- Position the probe just below the xiphoid process. Feel the lower end of their sternum to help position the probe.
- Encourage the patient to take a deep breath and hold it. This moves the heart closer to the probe and reduces interference from the lungs.
- Point the probe marker toward the patient’s left side (3 o’clock position).
- Direct the ultrasound beam superiorly and slightly to the left, angling it toward the patient’s heart.
- Rotate the probe marker to 12 o’clock (superiorly) and direct the beam along the midline to image the IVC entering the right atrium.
Clinical relevance:
- Useful for assessing pericardial effusion, chamber size, and wall motion.
- Used to evaluate IVC diameter and collapsibility, which reflect volume status and right atrial pressure.
Aortic arch
How to obtain:
- Place the patient in a supine or slightly elevated position.
- Extend the patient’s neck slightly to improve access to the suprasternal region.
- Position the probe in the suprasternal notch (the depression at the top of the sternum).
- Point the probe marker toward the patient’s left ear (around the 1–2 o’clock position).
- Direct the ultrasound beam slightly posteriorly and inferiorly to capture the aortic arch.
Clinical relevance:
- Assess for dissection, aneurysm, co-arctation, embolic sources, poster-operative follow up.